If you are thinking of starting a blog in 2021, you should put your mind at ease because it is easier than ever. Even if you don’t know anything about coding and web design, you can create your blog and manage it conveniently.
All you need is a little bit of guidance and the proper tools, and you are set to become a blogger. Through the guidance and tools, you can shrug off all the technical tasks of creating a blog, and all you have to work on is the content and aesthetics of your blog.
How to Create a Blog: Step-by-Step Guide
In this article, you will be provided with an extensive step-by-step guide on how to create a blog:
Step 1: Decide on a topic
Before you start setting up your blog, the first thing is to choose a topic for your blog. This should be your primary focus at this stage, and you can choose a niche or any general topic like food, travel, fashion, fitness, or business. Ensure that you choose a topic you are passionate about or at least have enough knowledge of.
Even if you do not choose your topic right now, you can still create a blog and decide your topic later, but it is better if you have something in mind.
Step 2: Choose a suitable blogging platform
Next, you need to decide whether you wish to have a free blog or a self-hosted blog. There are a lot of blogging platforms, such as Blogger.com, WordPress.com, and Tumblr.com that allow you to create blogs for absolutely no cost.
However, if you want to become a serious blogger, free blogging platforms may not be the best option. This is so because free blogging services have certain drawbacks, like limited monetization, limited customization, and limited traffic, but the biggest drawback is that you cannot control your blog fully.
Therefore, you should host your blog yourself, which is known as a self-hosted blog. Then you will have complete authority over your blog without any limitations. The blog will also be better-looking and more professional.
So get a free blog if you plan to do blogging only for a few weeks, but in every other case, it is advisable to get a self-hosted one.
Which blogging platform will be right for you?
In 2021, there are a galore of blogging platforms available on the internet. WordPress has become the most popular blogging platform in the last couple of years. Moreover, it is an open-source (free) platform.
Apart from WordPress, the other most popular blogging platforms are Tumblr, Ghost, and Medium. You can try any of these most popular ones, but WordPress is the best right now.
Step 3: Register your domain name after setting up your blog
For creating a self-hosted WordPress blog, you will be required to buy a domain name and choose a WordPress web hosting provider like Bluehost.
Bluehost is a great blog hosting platform and domain registrar, and you are recommended to use it. Bluehost gets your account activated in no time and provides the following perks as well:
- A custom domain name (free for the first year).
- Website hosting.
- Simple, one-click WordPress installation.
- Free business email accounts.
If you already have a web hosting provider, then you do not need Bluehost. You can choose any web host but make sure it has a ‘one-click install’ feature for blogging platforms like WordPress. Having this feature will enable you to set up your blog quickly and easily.
So after you have signed up with your web host, you can install a WordPress blog by following these steps:
- Log in to your user profile at Bluehost or any other web host.
- You will find a button called “WordPress” on the homepage.
- Click it. This will initiate the WordPress installation.
It is important to note that the activation of your domain name can probably take around 10 to 15 minutes. So don’t worry if you get a weird domain name in the beginning, it is just a temporary domain name. After WordPress is installed, you can choose your admin login and password for your account.
Step 4: Configure your WordPress blog
Now that you have set up your admin account on WordPress, you can get a feel of WordPress by visiting the dashboard. You can do this by entering this URL in your browser: yourdomain.com/wp-admin and then putting in your login credentials for your admin account on WordPress. After you have logged in, you will see something like this:

In order to customize your blog properly, you can check out the following settings on WordPress:
1. General Settings
Go to the left sidebar and click on “Settings” and then “General”.
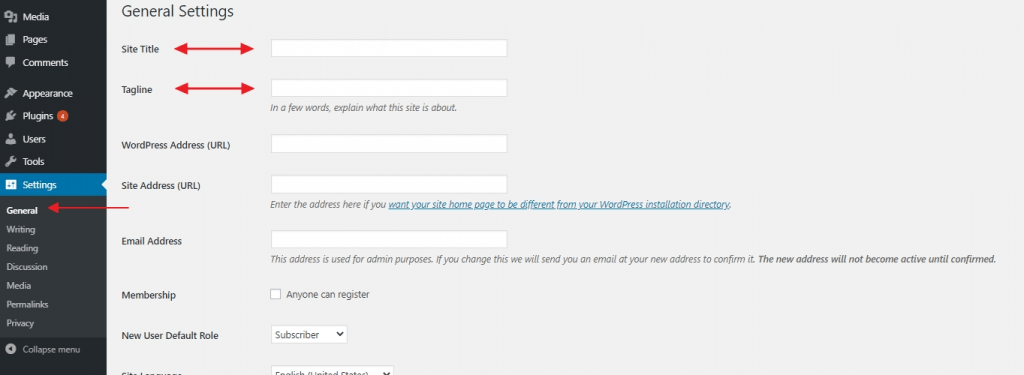
Here you will find the following settings:
- Site Title – You can enter the name of your site/blog here. The title is the most important aspect of your blog because this is the first thing that anyone observes. It also plays a role in how well your blog does in search engine rankings.
- Tagline – Here, you will have to enter what your blog is basically about. You have to basically summarize your blog in one line.
You can also check on this page whether your URL is correct along with your timezone and your preferred language.
2. Visibility in Google
The next important setting is to ensure that Google and other search engines index your new blog. To enable this, go to Settings and then select the “Reading” option from the main sidebar. Then you have to ensure that in the section, “Search Engine Visibility”, the field with the label “Discourage search engines from indexing this site” is unchecked.

If you fail to do so, Google will not be able to see your blog at all, so no one will find your blog on Google.
3. Permalinks
Through the “Permalinks” settings on WordPress, you can decide how the individual URLs of all your blog posts and subpages will be formed by WordPress.

All you need to do is to go to Settings and then select the “Permalink” tab. Then choose the option “Post name” and your permalink will be set to this variant. Of all the options available, this is the best and is also preferred by search engines like Google.
Step 5: Design your blog
The aesthetics of your blog is almost as important as the content and therefore, it is important that you do not leave this part out just because you feel that designing is not your thing.
Fortunately, WordPress has features that will make your blog look good without needing a professional graphic designer. WP has thousands of themes available, and the best part is that many of them do not require you to pay any money.
You can apply these themes to your blog and customize them easily without requiring any knowledge of coding. Here is how you can do this:
- On your WordPress dashboard, go to “Appearance.”
- And then in the subsequent menu that appears, select “Themes.”
- Now go to the “Add New” option and click on it.

- Then you can switch the tab to “Popular” to see the most popular themes.
- Now you can browse among the most popular WordPress themes and choose the one you like and is suitable for your blog.
- You can install it by selecting the “install” button next to the name of the theme and then select the “activate” option.
Step 6: Customize the design of your blog
The theme that you chose for your blog has a specific pre-configured design by default. However, WordPress still allows you to customize according to your own preference. All you need to do is go to “Appearance” and then select “Customize.”
You will be redirected to WordPress Customizer, which will look something like this:

You will see a number of options in the sidebar menu depending upon the theme you selected. The options generally include:
- Site Identity – This option lets you set your blog title again and add a logo image along with a site icon.
- Colors – This option allows you to adjust the basic colors used in your chosen theme.
- Header – This lets you configure your header graphic and image.
- Background – This option is for applying a background graphic, image, or color on your blog.
Step 7: Add new posts and pages to your blog
Since you have completed setting up your blog, now, you can start working on the content of the blog. In order to create a successful blog, you should have at least some of the pages mentioned below:
- Blog – This page is created by WordPress by default for you. All your blog posts will automatically appear here.
- About – This page is meant to give your visitors some information about you and your blog.
- Contact – Some contact information is necessary to put in so that your visitors can easily get in touch with you.
- Services/Products – A page that lists your products and/or services and tries to attract customers.
- Testimonials – A page that displays reviews of your products and/or services from your previous customers.
- Portfolio – This page is meant to display your entire body of work in an appealing manner.
1. Create New Pages
Now you know what pages to create, you might want to know how to create them. Creating a new page is a very simple process in WordPress. Before beginning, it is important to set your blog to the maintenance mode that will not let other people view your unfinished blog/website.
You can add pages simply by going to your WordPress dashboard, clicking on “Pages” and then selecting “Add New.” This will lead you to the main page editing screen of WordPress:
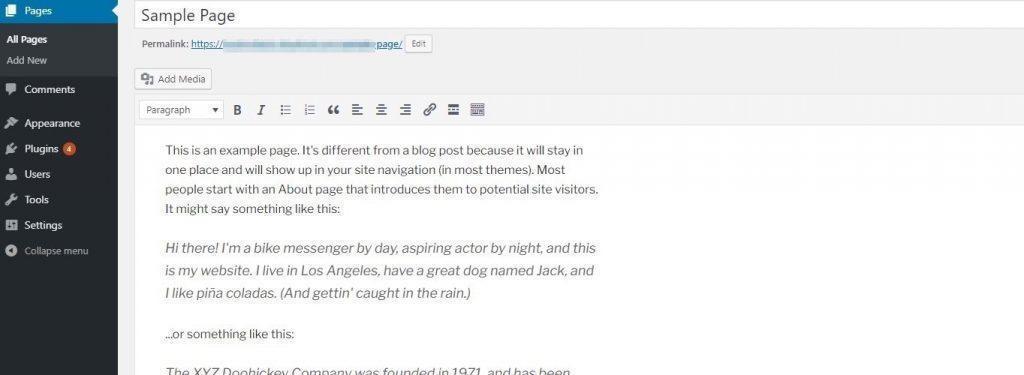
Now, on this page, you can write and manage your content. After finishing, you just have to click on the “Publish” button which means that your page is now visible to all.
2. Add Blog Posts
WordPress has an entirely separate section that is exclusively designed for creating and managing blog posts. This section is visible when you click on “Posts” on the WordPress dashboard sidebar.
The method of creating new posts is exactly like how you create new pages. However, there is one difference, which is that your posts will be displayed automatically on your homepage, but for your pages, you need to add them to a menu.
3. Add Navigation Menu
You will have to add your pages to a navigation menu for everyone to find them on your blog. Generally, your blog should have one main menu that is located in the main navigation bar because most people will expect to find this on your blog.
For creating a menu, you need to follow the steps detailed here:
- Go to “Appearance” on the main dashboard sidebar.
- Select the “Menus” option.
- Then you will see a window showing all the pages that you can check the boxes next to the options you want to add to your new menu.

- After you have finished, you can also check one of the boxes under “Display location.” The location of your main navigation should be listed there. To set this menu, you need to click on the button that says, “Save Menu.”
4. Customize your Blog Sidebar and Footer
The theme that you have chosen might have anywhere from zero to several sidebars available and maybe also a customizable footer. The WordPress feature that will allow you to tune up what is displayed in all these areas is widgets.
WordPress widgets are small blocks of content that you can exhibit in several places on a WordPress blog. Click on the Appearance tab in the WordPress dashboard and then select Widgets. Here you will come across a plethora of different widgets to choose from. Some of them are:
- Archives – Lists all your previous blog posts.
- Image – Displays any image chosen by you.
- Categories – Lists all the categories of your blog posts.
- Recent Posts – Shows all your recent posts.
- Search – Adds a search bar on your blog.
- Text – Lets you add a piece of custom text.
Apart from this, there are a lot more widgets to change the look and feel of your blog. You can position them in any of the predefined widget areas, which are usually located in the sidebar or the footer.
Conclusion
This guide must be enough for you to successfully create a blog of your own on WordPress. WordPress has definitely made the process of creating a blog so much easier as you must have noticed now that you have set up your blog in very simple steps.
Now you are ready to start your blogging journey and remember that WordPress allows you to change anything on your blog anytime in your journey.
People are also reading:
- How to Make a WordPress Website?
- How to build your website with WordPress?
- Free WordPress Themes
- How to Backup a WordPress Site for Free?
- Why You Need a CDN for Your WordPress Blog?
- What is WordPress Security?
- Best Managed WordPress Hosting
- How to Become a WordPress Developer?
- Common WordPress Errors
- How to Fix ERR_TOO_MANY_REDIRECTS on Your WordPress Site?